Zeven Development
 This is an image title
 This is an image title
 This is an image title
 This is an image title
 This is an image title
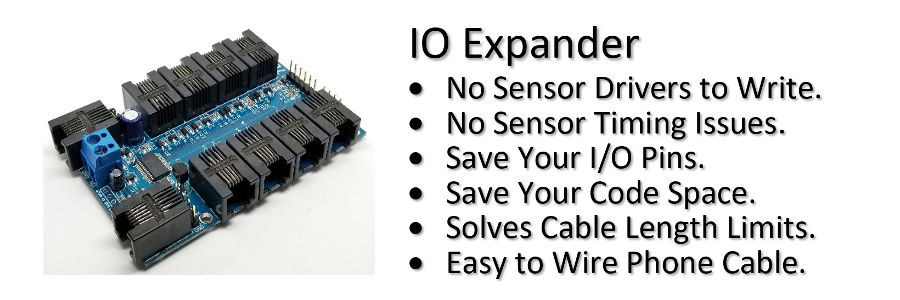
WiFi Expander
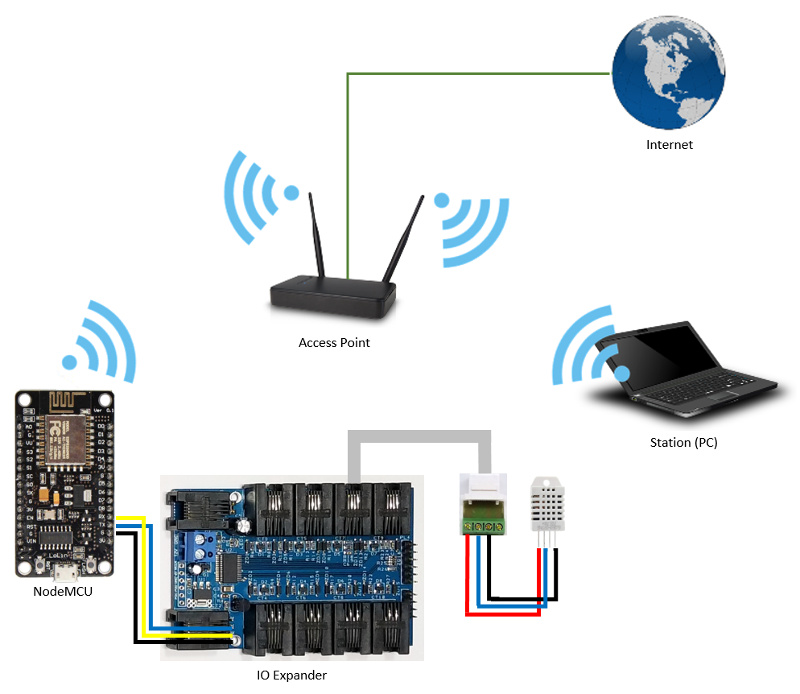
Connect the IO Expander to WiFi
Connect WiFi to the IO Expander using the NodeMCU ESP8266 and control sensors from any PC remotely on the network, or log the data to a local server or Web.
Wiring Diagram
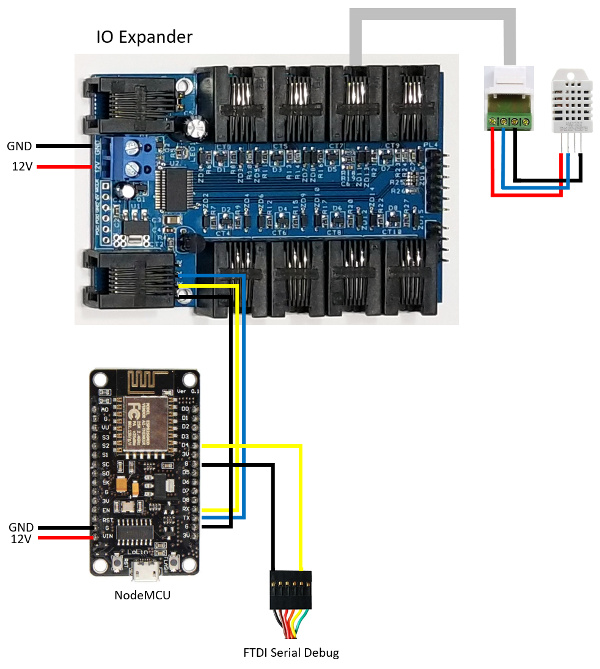
Note: Do not power the NodeMCU from the IO Expander since the ESP8266 can draw upto 800mA.
There are several ways that you can connect and access the IO Expander with the NodeMCU wifi module.
1. Use the NodeMCU as a WiFi Bridge

Program the following Arduino code into the NodeMCU. Make sure that you change the IP addresses and router SSID and password to match with your network. Set the IP address of the NodeMCU to be less than the starting IP address setup on your routers DHCP so that it will be reserved and static.
Note: When programming the NodeMCU using the USB port you will need to disconnect it from the IO Expander since the NodeMCU serial port is shared with the USB port.
						/* IO
						Expander

 *

 * WiFi Bridge

 *

 */


						#include <ESP8266WiFi.h>


						#define LED_BUILTIN 2


						//how many clients should
						be able to telnet to this ESP8266

						#define MAX_SRV_CLIENTS 1

						#define TCP_PORT (23)
						// Choose any port you want

						WiFiServer tcpServer(TCP_PORT);

						WiFiClient tcpServerClients[MAX_SRV_CLIENTS];


						IPAddress ip(192,
						168,
						1,
						7);
						// Local Static IP address

						IPAddress gateway(192,
						168,
						1,
						1);        //
						Gateway IP address

						IPAddress subnet(255,
						255,
						255,
						0);
						// Subnet Mask

						const
						char ssid[]
						=
						"*******";            //
						Change to your Router SSID

						const
						char password[]
						=
						"*******";        //
						Change to your Router Password


						#define SerialDebug Serial1
						// Debug goes out on GPIO02

						#define SerialExpander Serial
						// IO Expander connected to the ESP UART


						void setup()

						{

  pinMode(LED_BUILTIN, OUTPUT);

  digitalWrite(LED_BUILTIN, LOW);
						// Turn the LED on


  WiFi.setAutoReconnect(true);

  WiFi.mode(WIFI_STA);

  WiFi.config(ip,
						gateway, subnet);

  delay(100);

  WiFi.begin(ssid,
						password);


  while (WiFi.status()
						!=
						WL_CONNECTED)
						{

    digitalWrite(LED_BUILTIN,
						HIGH);

    delay(200);

    digitalWrite(LED_BUILTIN,
						LOW);

    delay(200);

  }


  // !!! Debug output goes to GPIO02 !!!

  SerialDebug.begin(115200);

  SerialDebug.println("WiFi
						Bridge");


  SerialExpander.begin(115200);


  // Start TCP listener on port TCP_PORT

  tcpServer.begin();

  tcpServer.setNoDelay(true);

						}


						void loop()

						{

  uint8_t i;

  uint8_t buf[1024];

  int bytesAvail, bytesIn;


  //check if there are any new clients

  if (tcpServer.hasClient())
						{

    for
						(i
						=
						0;
						i < MAX_SRV_CLIENTS;
						i++)
						{

      //find free/disconnected spot

      if
						(!tcpServerClients[i]
						||
						!tcpServerClients[i].connected())
						{

        if
						(tcpServerClients[i])
						tcpServerClients[i].stop();

        tcpServerClients[i]
						= tcpServer.available();

        SerialDebug.print("New
						client: ");
						SerialDebug.print(i);

        continue;

      }

    }

    //no free/disconnected spot so reject

    WiFiClient tcpServerClient =
						tcpServer.available();

    tcpServerClient.stop();

  }


  //check clients for data

  for (i
						=
						0;
						i < MAX_SRV_CLIENTS;
						i++)
						{

    if
						(tcpServerClients[i]
						&& tcpServerClients[i].connected())
						{

      //get data from the telnet client
						and push it to the UART

      while
						((bytesAvail
						= tcpServerClients[i].available())
						>
						0)
						{

        bytesIn = tcpServerClients[i].readBytes(buf,
						min(sizeof(buf),
						bytesAvail));

        if
						(bytesIn
						>
						0)
						{

          SerialExpander.write(buf,
						bytesIn);

        }

      }

    }

  }


  //check UART for data

  while ((bytesAvail
						= SerialExpander.available())
						>
						0)
						{

    bytesIn = SerialExpander.readBytes(buf,
						min(sizeof(buf),
						bytesAvail));

    if
						(bytesIn
						>
						0)
						{

      //push UART data to all connected
						telnet clients

      for
						(i
						=
						0;
						i < MAX_SRV_CLIENTS;
						i++)
						{

        if
						(tcpServerClients[i]
						&& tcpServerClients[i].connected())
						{

          tcpServerClients[i].write((uint8_t*)buf,
						bytesIn);

        }

      }

    }

  }

						}
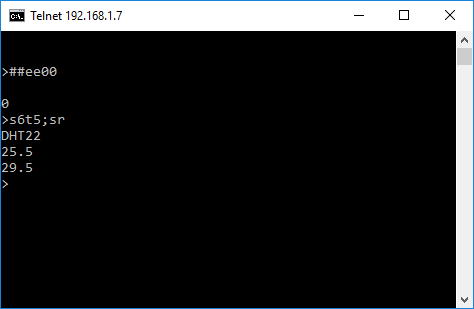
Use Telnet to connect to your IO Expander. Since Telnet echo's your keystrokes, turn off echo on the IO Expander using the command '#e0'. The echo command on the IO Expander saves it's setting in non-volatile storage so you only need to do it once.
2. Use the NodeMCU to Connect to the Web
Program the following Arduino code into the NodeMCU. Make sure that you change the IP addresses and router SSID and password to match with your network. Set the IP address of the NodeMCU to be less than the starting IP address setup on your routers DHCP so that it will be static and always be the same.
						/* IO
						Expander

 *

 * WiFi Web

 *

 */


						#include <ESP8266WiFi.h>

						#include <ESP8266HTTPClient.h>

						#include <IOExpander.h>


						#define LED_BUILTIN 2


						IPAddress ip(192,
						168,
						1,
						7);
						// Local IP address

						IPAddress gateway(192,
						168,
						1,
						1);        //
						Gateway IP address

						IPAddress subnet(255,
						255,
						255,
						0);
						// Subnet Mask

						IPAddress dns(192,
						168,
						1,
						1);            //
						DNS Server

						const
						char ssid[]
						=
						"*******";            //
						Change to your Router SSID

						const
						char password[]
						=
						"*******";        //
						Change to your Router Password


						const
						char host[]
						=
						"www.mywebsite.com";


						#define SerialDebug Serial1
						// Debug goes out on GPIO02

						#define SerialExpander Serial
						// IO Expander connected to ESP UART


						void setup()

						{

  pinMode(LED_BUILTIN, OUTPUT);

  digitalWrite(LED_BUILTIN, LOW);
						// Turn the LED on


  WiFi.setAutoReconnect(true);

  WiFi.mode(WIFI_STA);

  WiFi.config(ip,
						dns, gateway, subnet);

  delay(100);

  WiFi.begin(ssid,
						password);


  while (WiFi.status()
						!=
						WL_CONNECTED)
						{

    digitalWrite(LED_BUILTIN,
						HIGH);

    delay(200);

    digitalWrite(LED_BUILTIN,
						LOW);

    delay(200);

  }


  // !!! Debug output goes to GPIO02 !!!

  SerialDebug.begin(115200);

  SerialDebug.println("WiFi
						Web");


  SerialExpander.begin(115200);

						}


						void loop()

						{

  float temp, humidity;


  if (SerialCmdDone("s6t5"))
						{

    SerialCmd("sr");

    if
						(SerialReadFloat(&temp))
						{

      SerialReadFloat(&humidity);

      SerialReadUntilDone();


      SerialDebug.print(temp,
						1);

      SerialDebug.print(",");

      SerialDebug.println(humidity,
						1);


      if
						(WiFi.status()
						== WL_CONNECTED)
						{


        HTTPClient http;


        String url =
						"http://"

						String(host)

						"/sensordata.aspx";

        http.begin(url);

        http.addHeader("Content-Type",
						"application/x-www-form-urlencoded");


        String parameters =
						"sensorid=1";

        parameters

						=
						"&temp="

						String(temp);

        parameters

						=
						"&humidity="

						String(humidity);


        int httpCode
						= http.POST(parameters);

        String payload =
						http.getString();


        SerialDebug.println(httpCode);

        SerialDebug.println(payload);


        http.end();

      }

      else SerialDebug.println("Error
						in WiFi connection");

    }

    else SerialDebug.println("Error
						reading SHT22");

  }

  else SerialDebug.println("Error
						IO Expander");


  delay(60000);
						// Every minute

						}
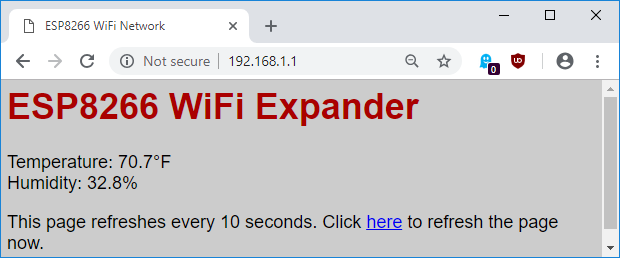
3. Use the NodeMCU as a WiFi Web Server
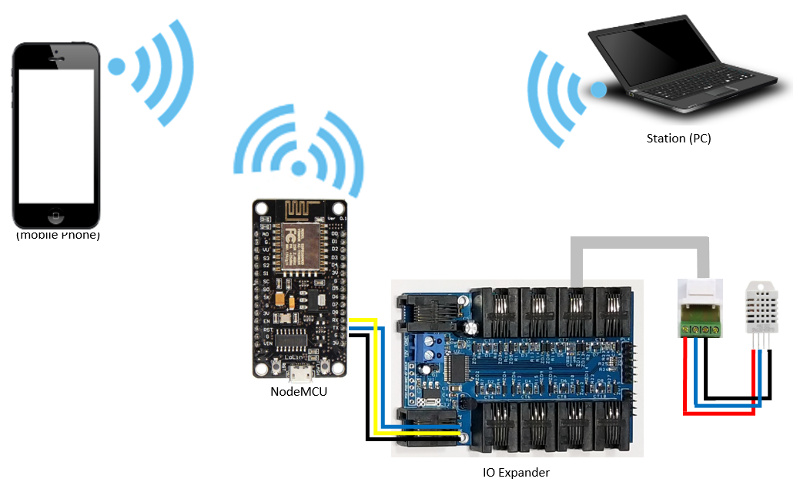
Program the following Arduino code into the NodeMCU. Make sure that you change the IP addresses and router SSID and password to work with your network. Make sure the SSID name is different from your routers name.
/* IO
Expander
*
* WiFi Web Server
*
*/
#include <ESP8266WiFi.h>
#include <ESP8266WebServer.h>
#include "IOExpander.h"
#define LED_BUILTIN 2
IPAddress ip(192,
168,
1,
1);
// Local IP address
IPAddress gateway(192,
168,
1,
1); //
Gateway IP address
IPAddress subnet(255,
255,
255,
0);
// Subnet Mask
const
char ssid[]
=
"esp8266webserver";
// Change to a unique SSID
const
char password[]
=
"*******"; //
Change to ESP8266 Password
// Define a web server at
port 80 for HTTP
ESP8266WebServer server(80);
#define SerialDebug Serial1
// Debug goes out on GPIO02
#define SerialExpander Serial
// IO Expander connected to the ESP UART
#define FAHRENHEIT
#ifdef FAHRENHEIT
#define C2F(temp) CelsiusToFahrenheit(temp)
float CelsiusToFahrenheit(float
celsius)
{
return ((celsius
*
9)
/
5)
32;
}
#else
#define C2F(temp) (temp)
#endif
void handleRoot()
{
float temp, humidity;
char szTemp[16]
=
"NA";
char szHumidity[16]
=
"NA";
if (SerialCmdDone("s6t5"))
{
SerialCmd("sr");
if
(SerialReadFloat(&temp))
{
SerialReadFloat(&humidity);
SerialDebug.print(temp,
1);
SerialDebug.print(",");
SerialDebug.println(humidity,
1);
snprintf(szTemp,
16,
"%0.1f°"
#ifdef FAHRENHEIT
"F",
#else
"C",
#endif
C2F(temp));
snprintf(szHumidity,
16,
"%0.1f%%",
humidity);
}
else SerialDebug.println("Error
reading SHT22");
SerialReadUntilDone();
}
else SerialDebug.println("Error
IO Expander");
char html[1000];
snprintf(html,
1000,
"<html>\
<head>\
<meta http-equiv='refresh' content='10'/>\
<title>ESP8266 WiFi Network</title>\
<style>\
body { background-color: #cccccc;
font-family: Arial, Helvetica, Sans-Serif; font-size: 1.5em;
Color: #000000; }\
h1 { Color: #AA0000; }\
</style>\
</head>\
<body>\
<h1>ESP8266 WiFi Expander</h1>\
<p>Temperature: &s<br>Humidity:
%s</p>\
<p>This page refreshes every 10
seconds. Click <a href=\"javascript:window.location.reload();\">here</a>
to refresh the page now.<p>\
</body>\
</html>",
szTemp, szHumidity
);
server.send(200,
"text/html",
html);
}
void handleNotFound()
{
uint8_t i;
String message =
"File Not Found\n\n";
message
=
"URI: ";
message
= server.uri();
message
=
"\nMethod: ";
message
=
(server.method()
== HTTP_GET)
?
"GET"
:
"POST";
message
=
"\nArguments: ";
message
= server.args();
message
"\n";
for (i
=
0;
i < server.args();
i++)
{
message
=
" "
server.argName(i)
": "
server.arg(i)
"\n";
}
server.send(404,
"text/plain",
message);
}
void setup()
{
pinMode(LED_BUILTIN, OUTPUT);
digitalWrite(LED_BUILTIN, LOW);
// Turn the LED on
WiFi.mode(WIFI_AP_STA);
WiFi.softAPConfig(ip,
gateway, subnet);
delay(100);
WiFi.softAP(ssid,
password);
server.on("/",
handleRoot);
server.send(200,
"text/plain",
"this works as well");
server.onNotFound(handleNotFound);
server.begin();
// !!! Debug output goes to GPIO02 !!!
SerialDebug.begin(115200);
SerialDebug.println("WiFi
Server");
SerialExpander.begin(115200);
}
void loop()
{
server.handleClient();
}
Connect to the SSID name given for the NodeMCU.
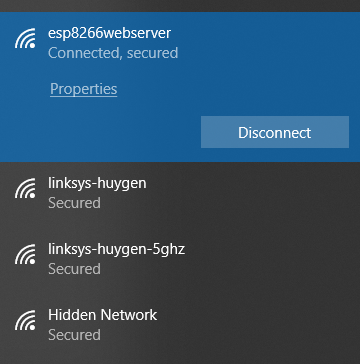
Use your browser to connect to the NodeMCU Web Server address.
So why use the IO Expander?
- Simpler to Design.
- No Sensor Drivers to Write.
- Uses Less Code Space.
- Less Than a Day to Write the Code.
- Easy to Wire Using Standard RJ11 Phone Cable.
- No Sensor Cable Length Issues.
- Cheaper to Build/Interface Than Commercial Systems.
- Easy to Make Changes to Adapt to Individual Requirements.
- Simple Serial Interface to use all IO Expander Sensors.